# How to Create a Virtual Machine Instance
Source: https://docs.quake.ai/docs/compute/how-to/create-instance
Markdown: https://docs.quake.ai/docs/compute/how-to/create-instance.md
---
# How to create a virtual machine instance
Create a virtual machine (VM) instance with your choice of operating system, hardware flavor, and network configuration. This guide covers the common path: booting from a public image onto an existing network.
For guided walkthroughs with specific network setups, see:
- [Create a VM on a public network](/docs/compute/how-to/create-vm-public-network)
- [Create a VM on a private network](/docs/compute/how-to/create-vm-private-network)
- An [SSH key pair](/docs/tools/add-ssh-key) uploaded to your account (or a [VM password](/docs/compute/how-to/create-password) configured)
- A [network and subnet](/docs/network/how-to/create-network) to place the instance on
- A [security group](/docs/network/how-to/create-security-group) with rules allowing SSH (port 22) at minimum
## Watch the video
[Quake AI How To: Getting started and setting up a virtual machine](https://rumble.com/embed/v4ffvgk/?pub=15t5lq)
## Create the instance
### 1. Base Config
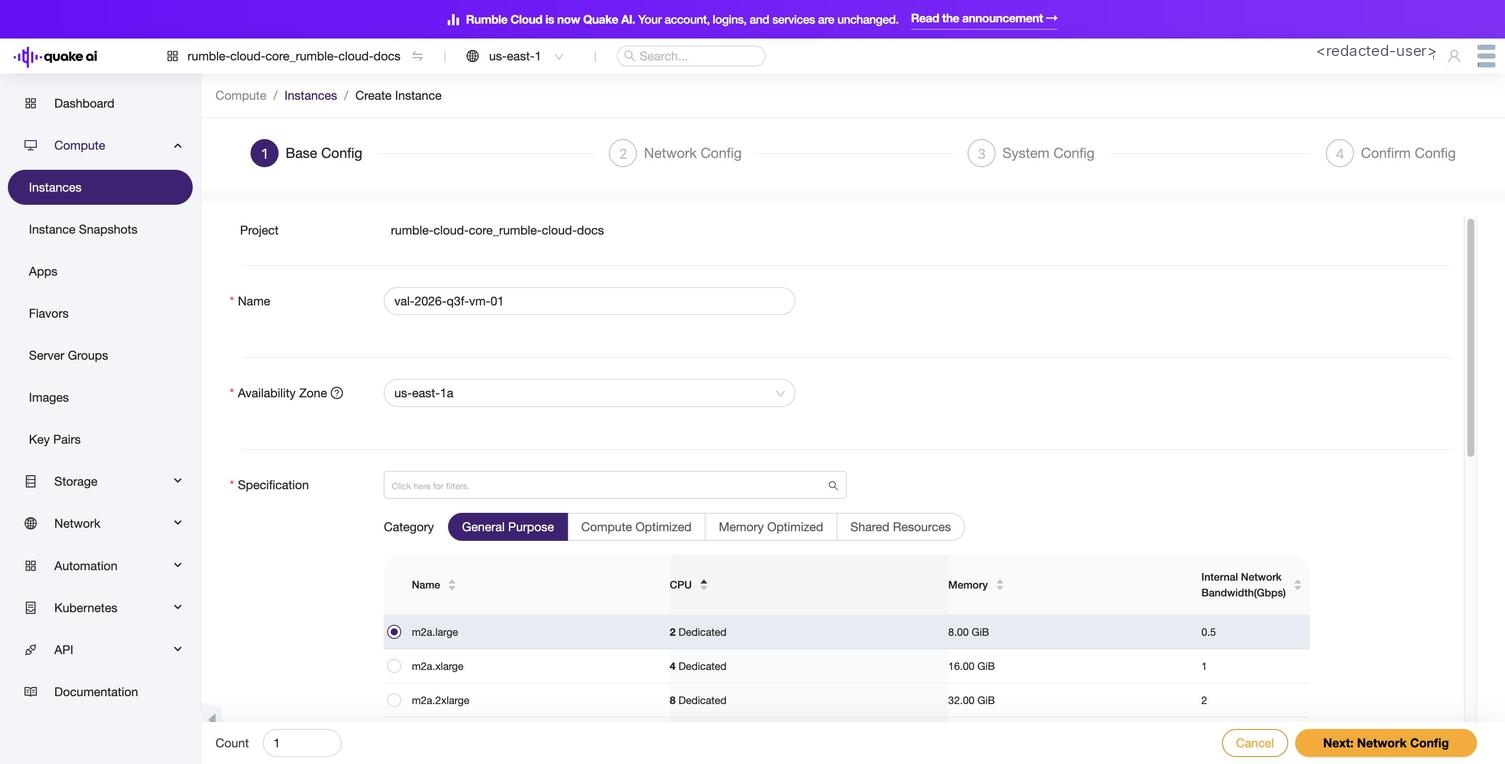
1. Select **Compute** > **Instances** > **Create Instance**. The wizard opens on **Base Config**, the first of four steps (`Base Config`, `Network Config`, `System Config`, `Confirm Config`).
2. Provide a name for the instance.
3. Select an availability zone (e.g., `us-east-1a`).
4. In the **Specification** section (this is where the wizard surfaces the flavor; the **Confirm Config** summary later renders the same value as `Flavor`), pick a hardware profile. Flavors are organized into category tabs:
- **General Purpose**, **Compute Optimized**, and **Memory Optimized** offer dedicated vCPUs (minimum 2).
- **Shared Resources** offers shared vCPUs (up to 8 on 2 dedicated vCPUs).
5. In the **Start Source** field (the wizard label; the doc refers to this as the boot disk source), pick one option:
- **Image**: select an OS. The wizard surfaces **Ubuntu** and **Rocky** as named filter tabs; the remaining public images appear under the **Others** tab. The picker renders each image with its full catalog name. The **Ubuntu** tab lists `Ubuntu-22.04`, `Ubuntu-24.04`, and `OpenClaw-Latest` (an app image whose Glance metadata declares `os_distro: ubuntu`, so the picker groups it under Ubuntu). The **Others** tab lists `AlmaLinux-9`, `AlpineLinux-3.23`, `Cirros-0.6.2`, and `FedoraCoreos-38`. Your own uploaded images appear in the same picker. Specify the disk size (minimum varies by OS; Ubuntu needs at least 2.2 GiB). Optionally check **Deleted with the instance** to clean up the disk when the instance is removed; leaving it unchecked makes the disk persist after instance deletion (the **Confirm Config** summary renders the unchecked state as `Not deleted with the instance`).
- **Instance Snapshot**: use a previously created [snapshot](/docs/compute/how-to/create-snapshot) as the boot image.
- **Bootable Volume**: use a persistent, detached [storage volume](/docs/block/how-to/create-volume).
See [flavors](/reference/compute/console/flavors) for details on available hardware profiles.
### 2. Network Config
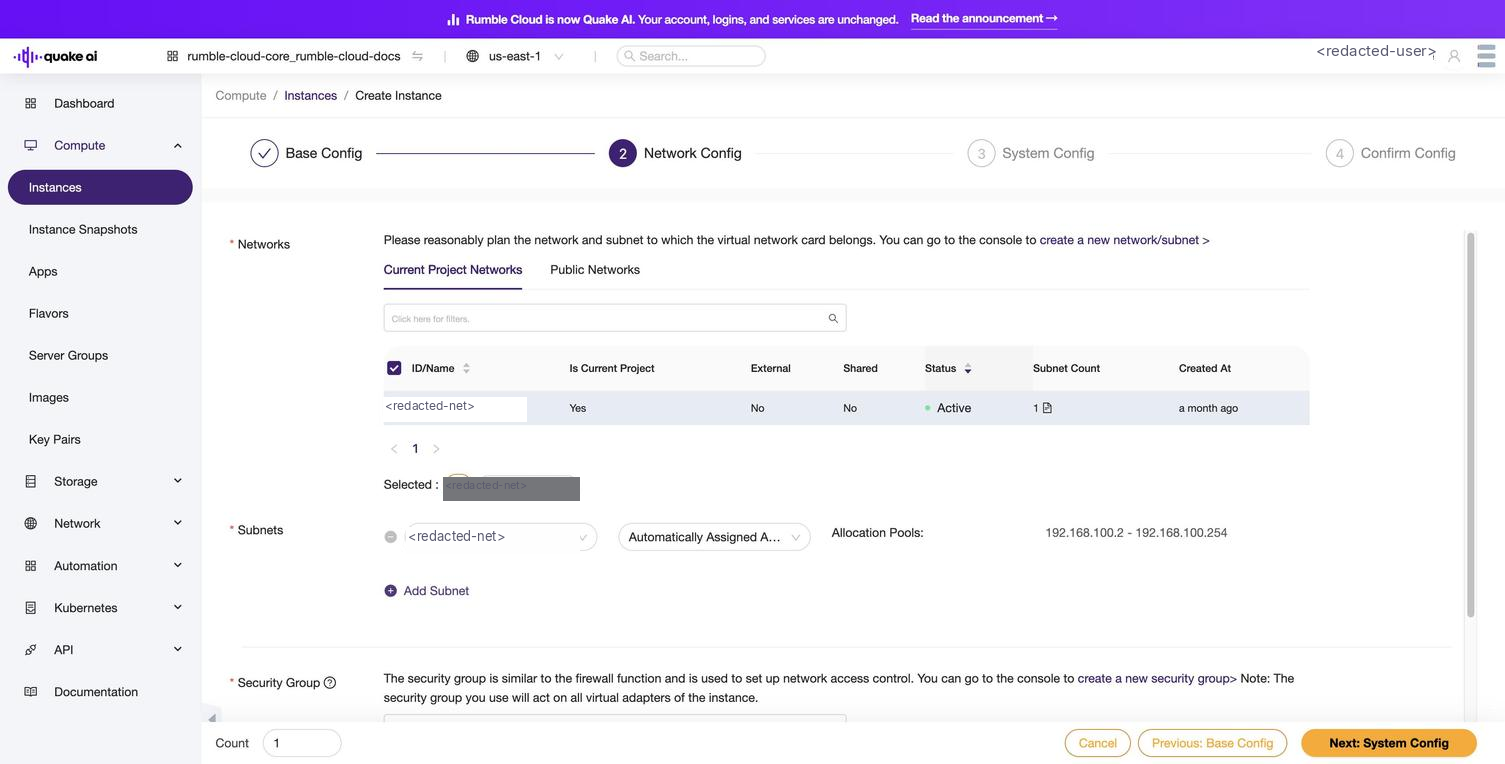
1. Select **Next: Network Config**.
2. Select a network from the **Current Project Networks** tab. For quick testing, select **Public Networks** > `PublicEphemeral`. The **Security Group** section is hidden until a network is selected; assigning a network is what makes it appear.
3. Select a subnet.
4. Assign one or more security groups in the **Security Group** section (the default group is always available).
5. Under **Advanced Options**, optionally attach an existing port.
### 3. System Config
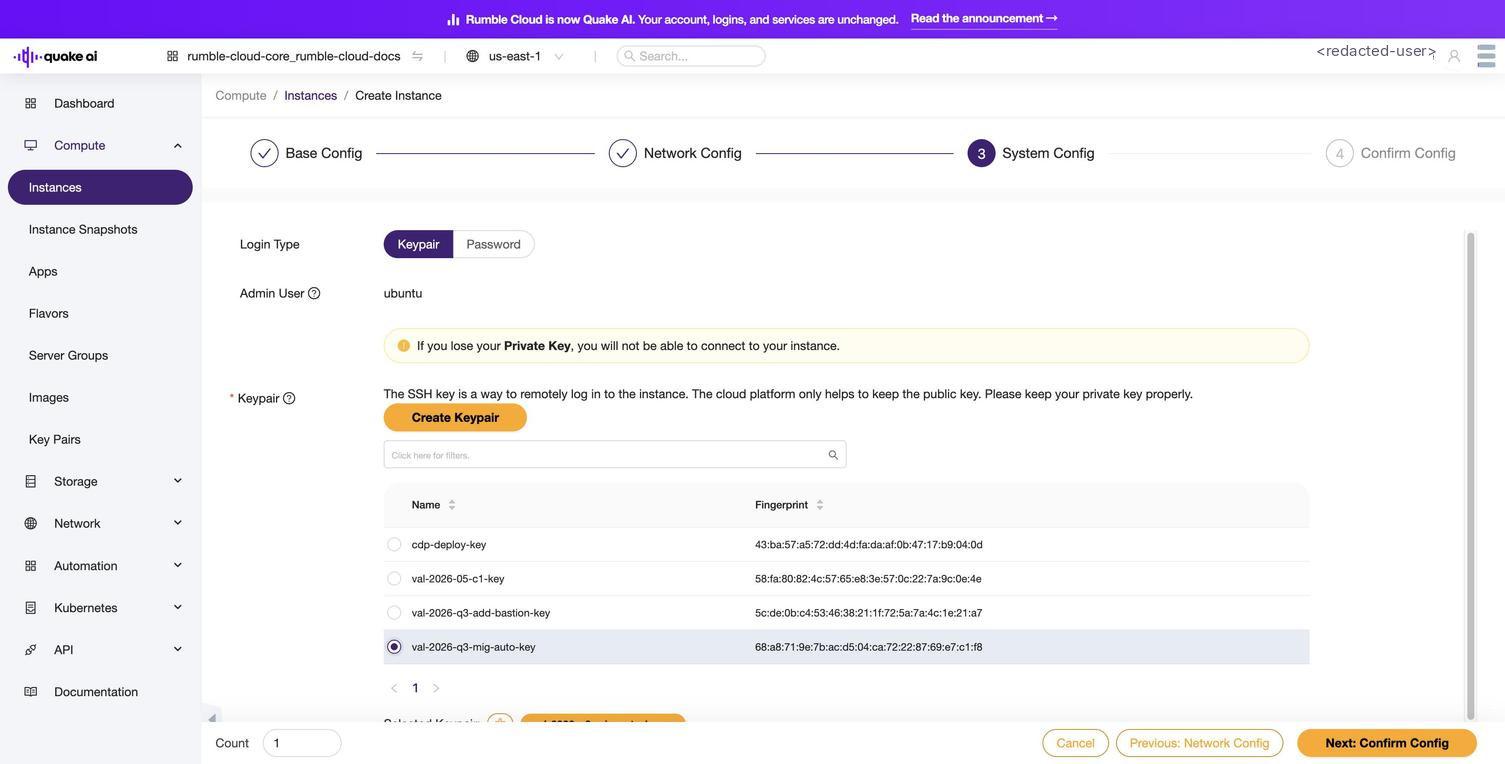
1. Select **Next: System Config**.
2. Choose a login type: **Keypair** or **Password**. The wizard exposes the two as an exclusive toggle. To enable both, set the password after creation with `openstack server set --password MY_INSTANCE` or inject it via cloud-init user data.
3. If using a keypair, select an existing key or create/upload a new one.
4. If using a password, enter and confirm it.
5. Under **Advanced Options**, optionally assign a server group and add user data scripts.
### 4. Confirm Config
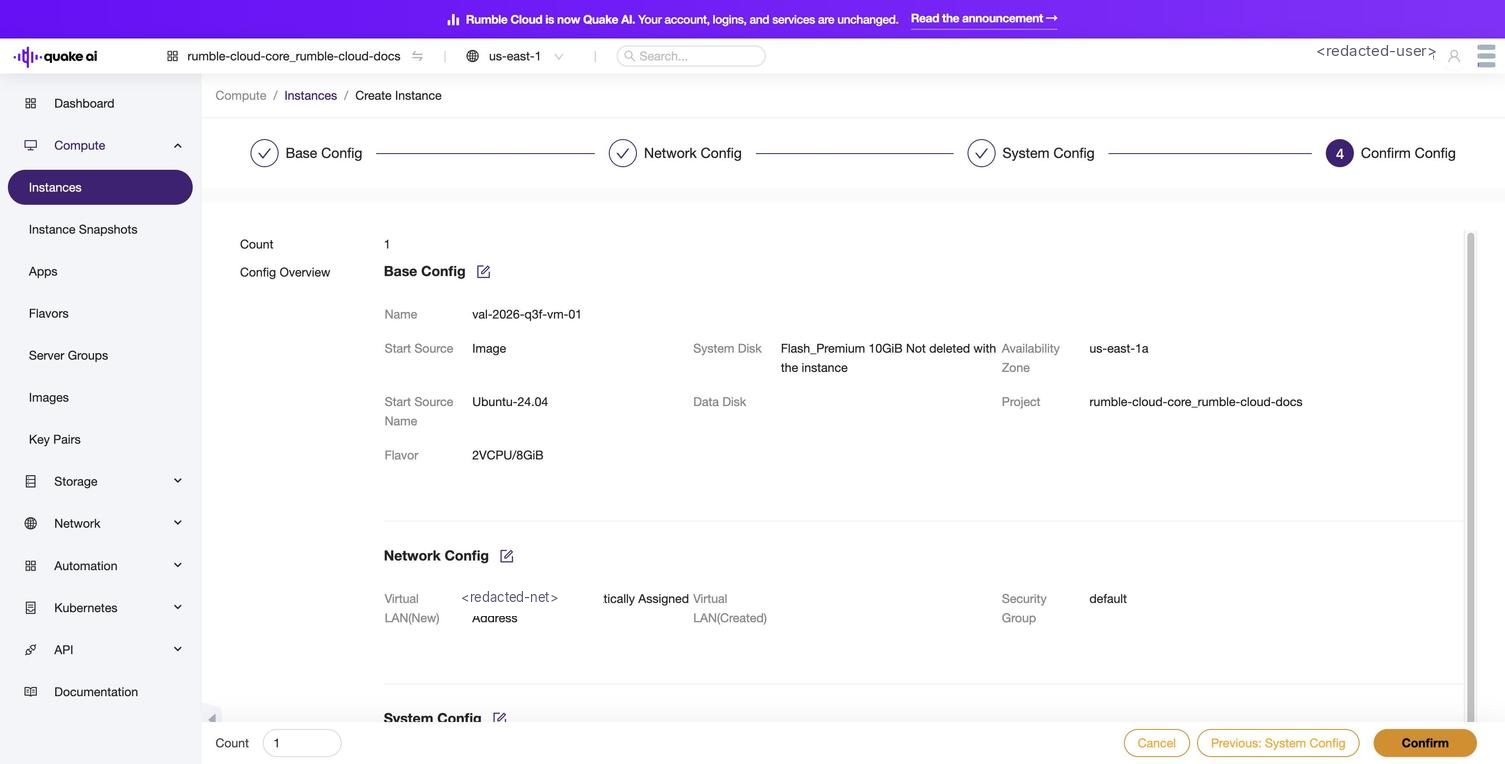
1. Select **Next: Confirm Config** to review your choices. The summary uses `Flavor` as the field label even though Base Config labelled the same value `Specification`.
2. Adjust the **Count** field if you have not already (see the callout below).
3. Select **Confirm** to create the instance.
The **Count** field appears in the wizard footer on every step (Base Config, Network Config, System Config, Confirm Config) and again on the Confirm Config summary. Set it once on whichever step is convenient to launch multiple identical instances from the same specification.
The Console delete-instance dialog does not remove attached volumes. The **Deleted with the instance** checkbox you set at create time controls whether the platform removes the boot volume. If you delete an instance without that flag, open **Storage** > **Volumes**, find the leftover volume by **Available** status and size, and delete it from the Console or with `openstack volume delete`.
Create an instance from a public image:
```bash
openstack server create \
--flavor c2a.large \
--image Ubuntu-22.04 \
--boot-from-volume 10 \
--network my-network \
--key-name my-keypair \
--security-group my-security-group \
my-instance
```
Key parameters:
| Flag | Description |
|------|-------------|
| `--flavor` | Hardware profile (CPU, RAM). Run `openstack flavor list` to see options. All Quake AI flavors have `disk=0`, so the root disk size is set via `--boot-from-volume`, not the flavor. |
| `--image` | OS image. Run `openstack image list` to see public and private images. |
| `--boot-from-volume` | Size in GiB of the root volume to auto-create from the image. Required for image-backed creates because all Quake AI flavors have `disk=0`. The volume is Nova-managed and deletes with the instance unless you change it. |
| `--network` | Network to connect to. Use a private network or `PublicEphemeral` for testing. |
| `--key-name` | SSH key pair name. |
| `--security-group` | One or more security groups (repeat the flag for multiples). |
To boot from a snapshot instead:
```bash
openstack server create \
--image MY_SNAPSHOT_NAME \
--flavor c2a.large \
--boot-from-volume 10 \
--network my-network \
--key-name my-keypair \
my-instance
```
To boot from a volume:
```bash
openstack server create \
--volume MY_VOLUME_ID \
--flavor c2a.large \
--network my-network \
--key-name my-keypair \
my-instance
```
Add `--user-data cloud-init.yaml` to pass a cloud-init configuration file for automated provisioning on first boot. See [How to configure a VM with cloud-init](/docs/compute/how-to/configure-vm-cloud-init).
```bash
curl -X POST "$OS_COMPUTE_URL/servers" \
-H "X-Auth-Token: $OS_TOKEN" \
-H "Content-Type: application/json" \
-d '{
"server": {
"name": "my-instance",
"flavorRef": "FLAVOR_ID",
"imageRef": "IMAGE_ID",
"networks": [{"uuid": "NETWORK_ID"}],
"key_name": "my-keypair",
"security_groups": [{"name": "my-security-group"}]
}
}'
```
The response includes the instance `id`. The instance status progresses from `BUILD` to `ACTIVE`.
```python
import openstack
conn = openstack.connect(cloud="rumble")
server = conn.compute.create_server(
name="my-instance",
flavor_id="FLAVOR_ID",
image_id="IMAGE_ID",
networks=[{"uuid": "NETWORK_ID"}],
key_name="my-keypair",
security_groups=[{"name": "my-security-group"}],
)
server = conn.compute.wait_for_server(server)
print(f"Instance active: {server.id} ({server.addresses})")
```
```hcl
resource "openstack_compute_instance_v2" "my_instance" {
name = "my-instance"
flavor_name = "c2a.large"
image_name = "Ubuntu-22.04"
key_pair = "my-keypair"
security_groups = ["my-security-group"]
network {
name = "my-network"
}
block_device {
source_type = "image"
destination_type = "volume"
volume_size = 10
boot_index = 0
delete_on_termination = true
}
}
```
See the [simple VM template](/resources/iac-templates/simple-vm) for a complete working example with network, router, security group, and floating IP.
## Verify the result
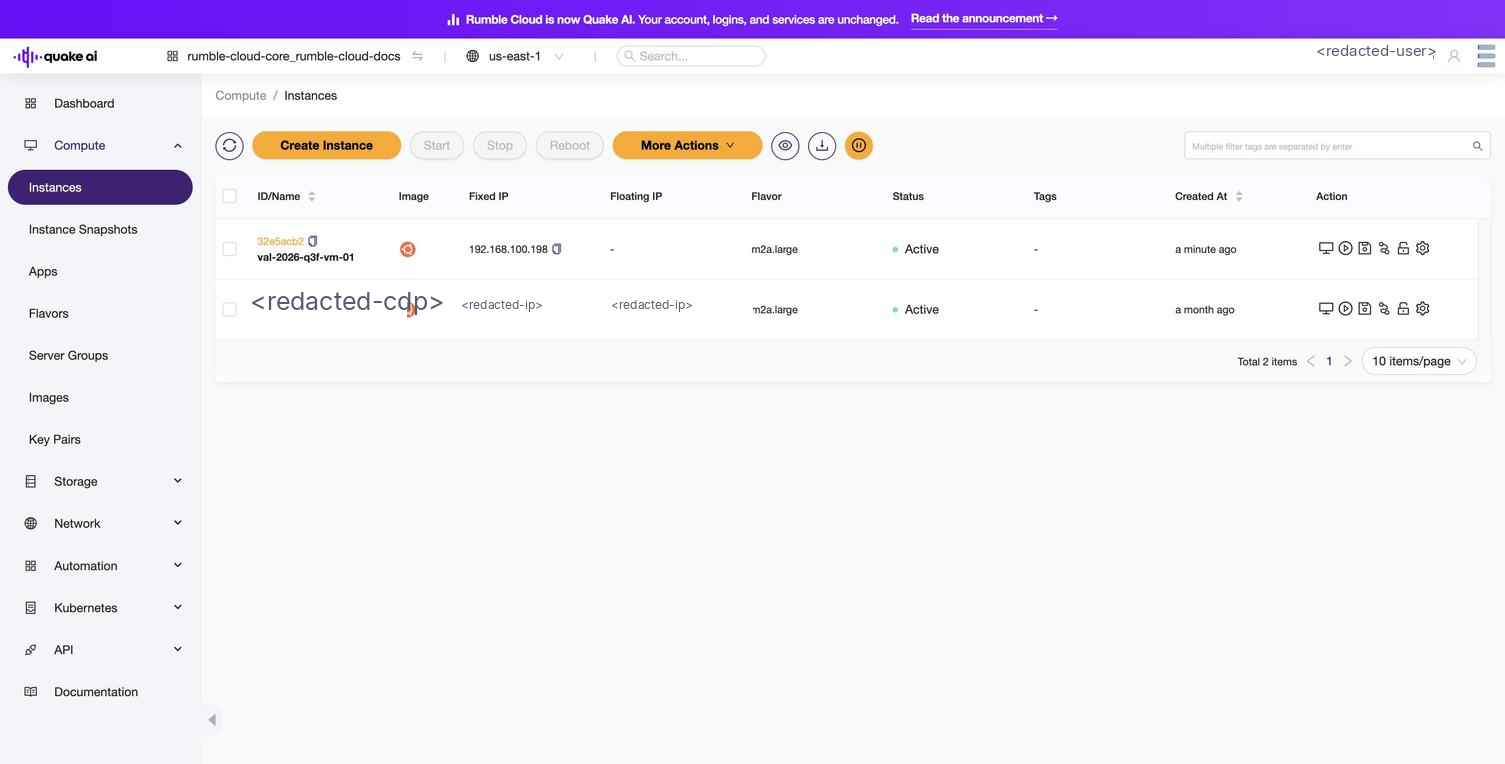
Navigate to **Compute** > **Instances**. The new instance appears with status **Active**. Select it to view details, volumes, interfaces, and security groups.
```bash
openstack server show my-instance
```
Confirm `status` is `ACTIVE` and the `addresses` field shows the expected network and IP.
```bash
curl -s "$OS_COMPUTE_URL/servers/SERVER_ID" \
-H "X-Auth-Token: $OS_TOKEN" | python3 -m json.tool
```
```bash
tofu show
```
## See also
- [How to provision a production-ready VM](/docs/compute/how-to/provision-production-vm): end-to-end workflow for sizing, network placement, cloud-init, and verification
- [Compute API Reference](/reference/compute): full parameter documentation for the Compute API
- [Instances CLI reference](/reference/compute/instances-cli)
- [Instances API reference](/reference/compute/instances-api)
- [Compute console](/reference/compute/console/index)
- [Flavors](/reference/compute/console/flavors)
- [How to create a snapshot](/docs/compute/how-to/create-snapshot)
- [How to allocate floating IPs](/docs/network/how-to/allocate-floating-ips)